Back
to Shopmade Tools
Make
a Kerfing Chisel
In
2011 I posted an article on
a kerfing chisel, a tool used to deepen the kerf in half-blind
dovetails.

The
idea for this came from a method used by Tage Frid, who used either a
scraper blade or, as I viewed in a video, a section of bandsaw blade.
The kerfing chisel was my effort at making a specific tool, rather
than buggering up a prized scraper blade.
In the years
since, I am aware of two similar tools, the first was by Ron Bontz
and the second by Rob Cosman. Both are shaped like saws, complete
with brass backs and scraper plates. They do the same thing.
Over
the years I have received many queries how to make a kerfing chisel,
and this posed a problem since I had made it from a steel gardening
trowel/spatula. These can be difficult to find. I have been thinking
of other ways to make this easier for anyone interested in rolling
their own. This is what I came up with ...
At the moment I
am testing out a few different sizes ...

Top
is Jarrah and bottom is Hard Maple.
A few others
...

The
parts include a scraper blade (these are 0.03" thick). I was
curious to see whether this would create a problem when dovetail saws
have a 0.026" kerf (0.02" plate plus 0.003" set, which
is considered "fine"). See the end for more information. A
ferrule is made from brass tube.

Turn
the handle, and then saw the slot for the blade using a bandsaw.
Place the handle on a V-jig to hold it steady. Ensure that the shaft
matches the depth of the ferrule (so that is bottoms out against the
end of the handle). Epoxy everything together.
So why is a
kerfing tool so useful that it warrants being made into a specialised
tool?
Here is a half-blind pin board socket being sawn.
Note the diagonal angle, which leaves half the socket ...

This
is where the kerfing chisel is used: First clamp the ends of the pin
board. The edge of the blade is squared (not bevelled like a chisel),
but it has the potential to split or cleave a board. The clamp helps
prevent this.

Tap
the blade into the kerf, to full depth, moving towards the boundary
line a little at a time - be especially careful with the outside
kerfs, where there is less support.

I
have been doing this for a decade and may have had 2 or 3 splits in
all this time, mainly from being careless.
When chopping
into the socket, the deepened kerf will make it easier to split out
the waste ...

The
blue tape makes it easier for older eyes to see lines
...

Cleaning
out the waste is significantly easier ..
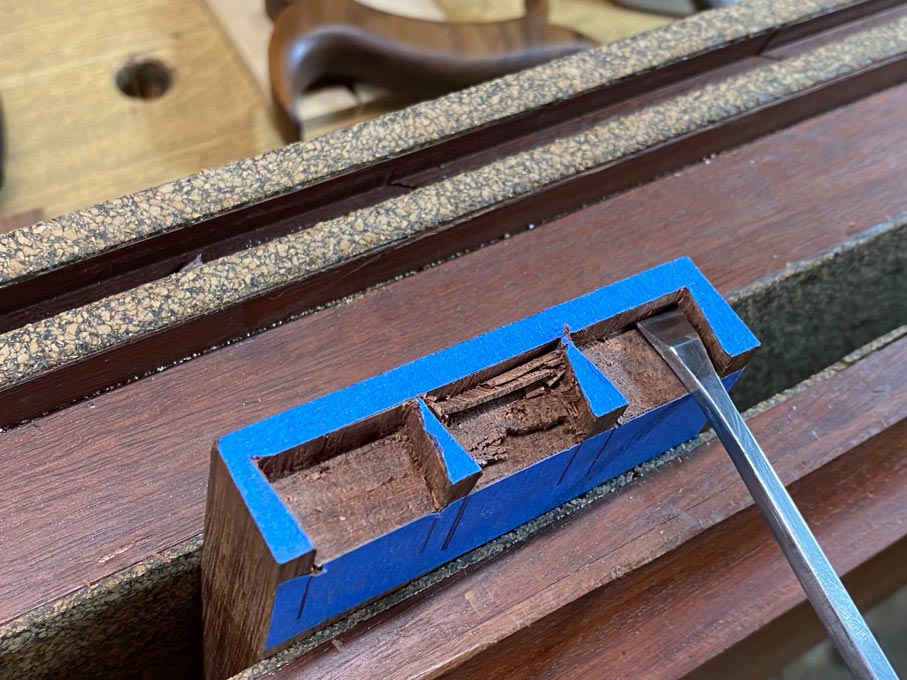
Removing
waste leaves clean sides to the sockets ...

This
is saw-to-saw cut ...

I
have done a little experimenting with plate thickness for kerfing,
and so far it seems that this does not make any significant
difference.
Most saw plates are 0.020” thick. Then add 0.002
- 0.004” each side for the set of the saw, and you end up with
something closer to 0.030” than 0.025”.
Then there is the
accuracy of sawing to the line - how close can you get? Are you
within 0.003 of the line, or less? In other words, is the thickness
of the kerfing plate largely responsible for changing the socket
size? I do not think so. The tightness of your sawing will have more
of an effect.
Plate thickness will affect how easily it cuts
into the wood. Thicker should require more effort. However, this is
affected by how big a bite one takes. That also is determined by the
hardness, and brittleness, of the wood.
I measured some of the
cabinet scrapers in my collection. They were mostly greater than
0.03”. Paint scrapers from the big box were greater than this, and
some have used these successfully.
Bottom line: at this time I
would argue that a blade up to 0.030” is fine. Note that I am still
experimenting.
UPDATE
ON THE ABOVE:
There
are two important
features to consider if you plan to build a kerfing chisel.
1.
The first is that thickness does influence the process and outcome.
The thicker the blade, the more effort to pound it into the wood.
More
importantly, if you are one to saw to the line, using a blade wider
than the saw kerf will widen the socket, and the result will be a
loose fit.
Of course, if you do not saw to the line, then there is simply more
effort involved.
Over
the past week, while building 10 drawers, it has been apparent that a
thin bladed kerfing chisel is significantly easier to use. There
is much less effort involved with, say, a 0.024” blade versus a
0.030” blade.
2.
The second issue is that it is not enough to simply epoxy in the tang
of the blade. The blade is subject to much lateral forces, and
eventually will come loose. In order to prevent this, the
ferrule/mortice/blade needs
to be pinned.
I used 2mm diameter mild steel nails. Since I have been making blades
with stainless steel (see picture for source of SS scraper blades),
the drill bit of choice is one made from tungsten carbide.


When
striking the kerfing tool, saw or chisel style, you want to use a
steel hammer. The energy from one is better focussed than a wooden
mallet. I added a ferrule to the kerfing chisel I made a decade ago,
and which I have been using since. I use Japanese chisels a lot, and
copied this style. The kerfing chisel in this article is being used
sans-ferrule. These are all hard woods: rich reddish Fiddleback
Jarrah, creamy Hard Maple (USA), and some type of West Australian
Cassurina, very hard and wonderful colours. I have been using a 225gm
gennou, and not seen any signs of damage to date, however use has
been short.
Regards
from Perth
Derek
January
2021