Back
to Building Furniture
Completion
of the project
When
I began building the armoire I decided to post the steps on the
forums with the hope that it created interest and discussion, and
that out of these discussions we could debate different ways of
design, construction and technique. It was also my intention to
include some of these discussions - or at least the ideas - in a
series of articles on my website. I have started collated the
information and posting it. It has been a huge task trying to find a
balance between a build sequence and all the detail that has been
offered up by forum members. So feel free to say if you feel
something has been omitted or needs to be emphasized.
Well
we are no longer in the home straight - the armoire is complete (save
for one tiny modification, which came to light as I printed these
images).
Possibly the biggest headache at the end was
designing the handles (used on the doors and drawer). I must have
built a dozen in all. The handles that Lynndy liked just did not
work, and in the end she agreed. Fortunately she likes the ones that
I ended with. I wait with bated breath to hear your opinion.
The
reason for the difficulty was the diamond inlay that I added to the
doors. It created a theme, and simple round handles now really looked
out of place. The diamond added a spark of interest in what otherwise
might have become "just another country style armoire" (I
built one similar to this several years ago, and for that one used
Jarrah raised panels in a Hoop Pine carcase. Of course, that one was
largely build with power tools, where this one has been largely build
with handtools).
The other change was to the mirror that was
planned to go over the top of the armoire (the armoire is just 53"
high from top to bottom, so the top was intended as a dresser for
guests). The mirror was built ... but more on this shortly.
In
addition to the handles and the mirror, I have added a top to the
cabinet.
OK, so here is the result ...


The
top has some really nice fiddleback Tasmanian Oak ..

A
closer look at the drawer ...
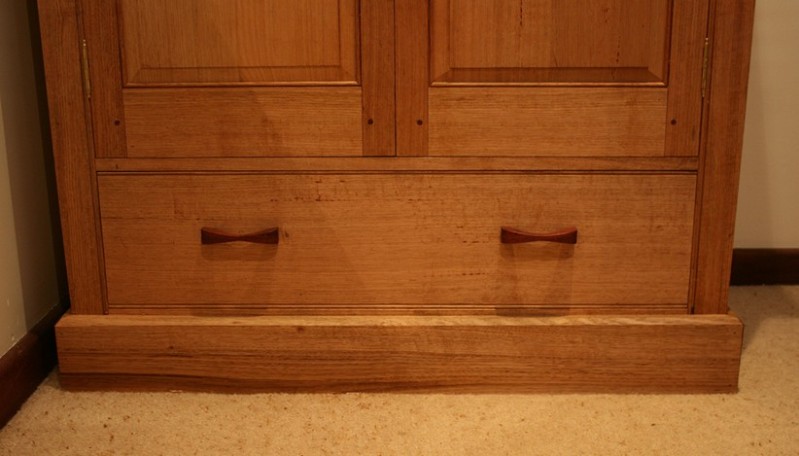

And
the handles .... !


The
armoire is shallow to save space as the guest bedroom is on the small
side. The design placed the hanging direction forward rather than
sideways. This is where I have a slight modification. My original
build just rounded the face of the hanger. It occurred to me later
than this was not in keeping with the diamond and the dovetails, so I
reshaped the front. I left the back round as it cannot be seen at the
dark rear of the cabinet. Of course, when I took the pictures, I
could see the round back, and it now, too, must be altered ..


What
of the mirror? The mirror!!
I fell in love with the mirror ..
or to be more correct, the wood. This is Jarrah at it best! What
started off as recycled waste turned into a stunning piece of art (in
my eyes, at least
 ).
Origonally I had planned to place it over the top of the armoire. It
was sized to fit exactly when hung on the horizontal. However, when I
tried it there it both dominated the armoire and made the combination
feel too tall in the room. So I hung it in the vertical alongside the
armoire. I think that guests will be charmed by it (and if not, then
they will be shown the door!).
).
Origonally I had planned to place it over the top of the armoire. It
was sized to fit exactly when hung on the horizontal. However, when I
tried it there it both dominated the armoire and made the combination
feel too tall in the room. So I hung it in the vertical alongside the
armoire. I think that guests will be charmed by it (and if not, then
they will be shown the door!).
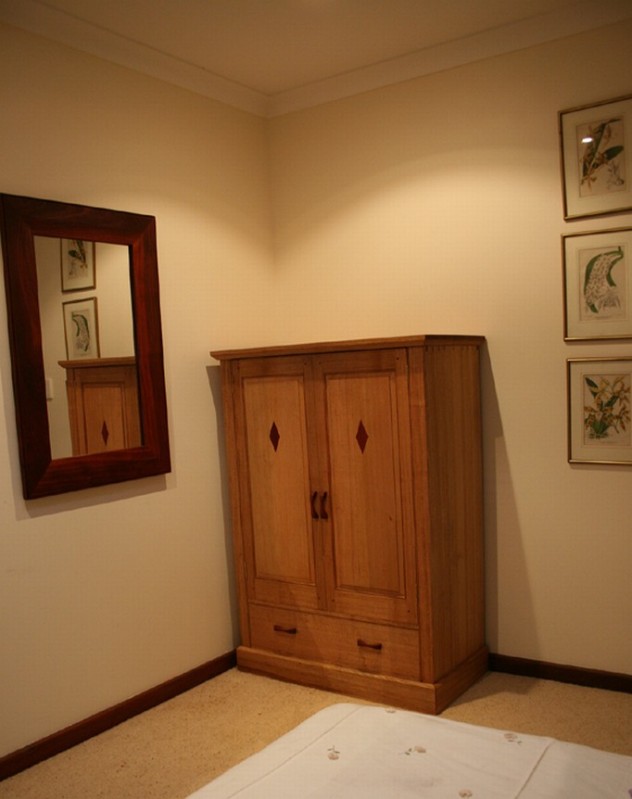

The
figure is just stunning and these picture do not do it justice ...


So
there you have it. Done. Finally.
My most sincere thanks to
all of you who contributed with your advice and critique (and don't
stop now).
Regards from Perth
Derek
January
2010