
Back to Powered Tools and Machinery
Router Table Adventure
I have just completed a router table build ... not for the first time, I must add, and probably not for the last time. This one is a little more than the last, and I’m sure that the next might be a little more than this one.
The
irony is that I do not use a router table very often … possibly
only a few times each year! So why have I gone to all this effort?
Well, because it is fun and interesting.
This is as full-on a
set up I could build. What is relevant is that the essential
parts did not cost that much (links to parts included), relative to
what is available from the big names. The essential parts are the
router (an Elu 177e, purchased used on eBay UK for about $100), the
aluminium insert plate, was purchased about 3 years ago from Timbecon
($100), a Router Raizer lift ($100, available from Rockler),
and a MuscleChuck
($100), a router bit extension for above-table bit changing. All up,
with the fence, about $500. I would argue that this compares well
with set ups in the range of $2000 and upward.
There non-essential (but fun and useful) items, such as the JessEm ClearCut Stock Guides ($79 on special from Woodcraft), and the Wixey Digital Height Gauge ($105, eBay).
The
base
for the router table was a laminated high pressure MDF kitchen bench
off cut from a kitchen maker ...
Screws are used for levelling …

… track installed for the fence …
… and a scale glued to the track for fine adjustments …

This
was built into the outfeed of my Hammer K3 sliding table saw ...

For those with the K3, this is how it was attached (photos of the previous router top) ….

The
top ...
...
is secured at one side by bolts into inserts (there are convenient
holes in the saw case) ...
Facing
the saw, add bolts as levelling legs ...
And
the far side I used existing bolt holes to support an aluminium
section ...


Replaced the bracket for the table extension …

All
bolted down (current router table) …
The on-off switch has seen a few router tables. I prefer it at my right hand. The router connects to this, and then the switch connects to the vacuum cleaner, which has automatic on-off when the switch is thrown.

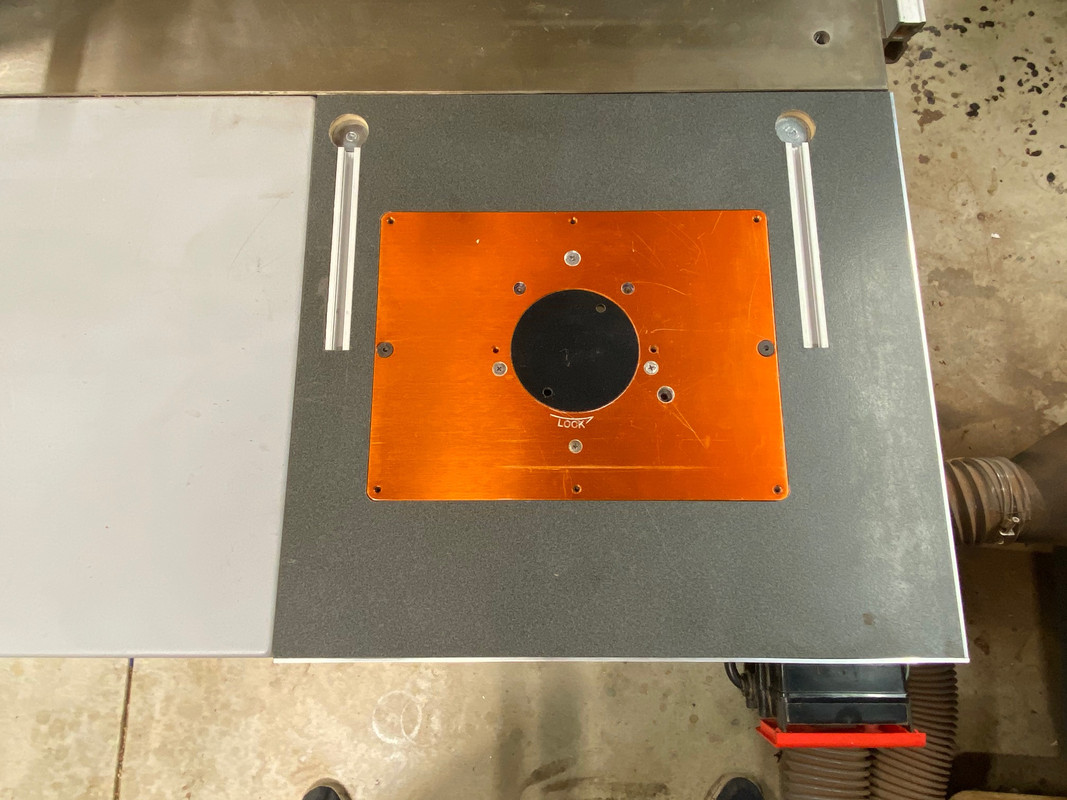
These
Timbecon
aluminium plates
are excellent. After 3 years of hanging the heavy Elu 177e
(predecessor of the DeWalt DW625) , there are no signs of any
dipping. The surface remains flat.
The
stripped Elu below, minus handles, with Router Raizer attached ...

Above
the plate, the MuscleChuck allows for changing bits and easy
bit-holding. I built a handle for the Router Raizer from a cut-down
socket wrench. This enable fast spinning as well as fine adjustments
with the fence close by.

The advert for the Router Raizer reveals the parts and how it is connected …

The
heart of the fence is made for 8020 extruded aluminium (80mm high and
20mm wide). I comes in 1m lengths ($28, eBay), and this fence is
600mm long.

Note
that the slots of this extrusion use different T-track bits (common
T-track bit at top) ...

The
only other parts I bought in were the sub-fences
($31
from Timbecon),
since these are phenolic-coated (UHMW polyethylene),
which is hard-wearing and slick,
and the dust
port
(also Timbecon).

Also
note that the dust collection port in the main fence was made with a
2 1/4" hole saw ...

The
JessEm guides, and the guard I made ...

The
JessEm
guide
does two things simultaneously:
1. Rollers
are fitted with one way roller bearings to ensure each roller spins
in the direction of the feed to prevent kickback.
2.
The wheel is angled inward 5 degrees, towards the fence, which locks
the work piece against the fence for a clean cut ....

The
guard is made of acrylic, formed in two sections and superglued
together ...

The
rear of the fence, with the dust port, and sub-fence adjusters ...

The
reason for bolting on the dust port was not simply to make it
possible to attach, but this enabled the T-track to be plugged and
maximise dust extraction ...

I
originally built UHMW square brackets for the fence, then replaced
them with a set from Banggood, which were stiffer (knobs again from
Timbercon) ...

The
fence is square to the table ...

I
have considered adding a micro-adjuster. Frankly, the tap-tap of a
mallet or hand works just as well.
Here
is the basic extrusion. A spacer is added to extend the track a
couple of millimetres past the sub-fences ...

![]()
The
spacer is UHMW (I wanted something I could machine to size, and liked
that it was black and will not degrade), which is hard and fairly
stiff. However, there was a smidge of flex, and so added a lot of
T-bolts. I should point out that this is only made necessary as the
JessEm hold downs are used. They have wheels which need to not be
allowed to flex away ...

![]()

![]()
The
last photo is self-explanatory ...

![]()
For dust extraction, I was inspired by the MilesCraft system …

I did purchase one, and discovered that it did not fit the Elu router well enough. I passed it on to a fellow woodworker, and decided to make something similar.
The dust collection consists of below table collection from the router bit ...

Note: the Elu 177e is a 30-year old router design, and they did not come with dust control in those days! Elu was taken over and became DeWalt. The DeWalt DW625 is the same router .. and this comes with a dust spout. The base of the DeWalt is not quite the same design, but close enough to modify to fit. Which I did.

To
aid in adjustment raising and lowering the router, one spring was
removed …

Dust
extraction is via the fence and via the dust spout using the Festool
Router Table twin hose system, and into a Festool CT 26E.
The twin hose ($175, from Festool) …


So … here we have the router table …
… and there is a small bracket on the left corner …

This is a Wixey DRO … now flipped up …

To use, first install a router bit …

Lift the bit …

… flush with the table top.

Now set the Wixey to zero …

Finally, raise the router bit to the desired height. Here it is 6mm (one can work in Imperial as well as Metric) …

The plan is to run a rebate along four edges of this Black Walnut offcut, and see how much dust remains on the table.

Below is the result. Four edges rebated. Two grains of saw dust evident on the table. Nil on the floor.


Very happy with this outcome.
The fence is stored above the table saw.

Regards from Perth
Derek
February 2021